Post by Swordbrother Nova on Mar 16, 2010 22:54:57 GMT -5
This is a tutorial you can find on the gwynedd website
www.kingdomofgwynedd.com/index2.cfm?page=HowToArea/Gwynedd-Pants/index.htm
Here's a tutorial I made that's up on the national boards, it's not period, but they are easy to make and comfortable, I have a pair, Glaum bought several from me, and Izad now has a pair as well www.dagorhir.com/forums/index.php?topic=13936.0 I'ma copy and paste the tutorial here as well
Here's an easy way to make some nice baggy pants that are very comfortable and easy to fight in, I have yet to find a reason to not like this pair of pants that I made with this pattern. (please excuse the terrible paint skills, my pen tablet doesn't get along with paint on my computer)

First things first get your fabric, 2 yards should be plenty (I used black Linen), lay it out on the floor and fold it so that there are four layers of fabric.
The measurements you'll need are:
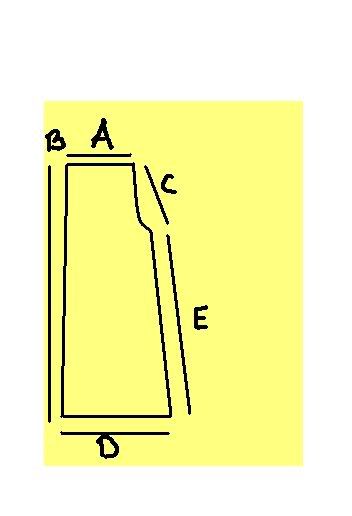
A - 1/4 of your waist (make sure you add about two or three inches for seam allowance and for them to be pulled together with the draw string)
B - This will be how long the pants are PLUS seam allowance (remember, when you hem the waist and pant legs you may want to leave enough room for elastic or a drawstring!) Also, I'd suggest you start flaring out a bit from the waist immediately, if only a little.
C - This is the crotch. on my pair I made a very low crotch the length was over a foot, and the curve wasn't very dramatic, keep in mind, they should curve in a little over half of your waist's thickness (not as in around your waist, think more like small of your back to your navel thickness, now, make it bigger, because your butt works into the equation.) Don't be afraid to make the curve a little too big, it should be located a little closer to the bottom.
D - Is half the width of your pant legs at the bottom (don't forget the seam allowance)
E - This isn't important to measure, it's the length of the leg under the crotch (I have it marked so I can easily say which seam to sew)
Now that you got your measurement pin them/ draw them (in chalk) on your fabric, make sure that all four layer are lying flat and cut.
Now you've got four panels, take two and pin them together so that they line up evenly (lay one on top of the other) and sew the seam along C Don't go in to E though! you will make a skirt if you do! Take the two unsewn panels and do the same thing.
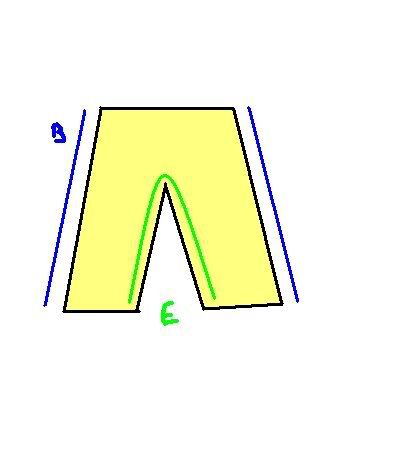
Congratulations you now have turned four pieces of fabric into two. Unfold them and put the two pieces right sides together so that they match up evenly (Remember, the right sides of fabric are the sides that will be seen, so you sew it inside out.) Pin the seams Lettered as B, they will be the two outside seams now that go down the length of the pants (look at the picture below) and sew them together.

This part (for me) is the hardest part of the project, and it's not too difficult. You're going to sew the insides of the legs together (the seam I labeled as E) and sew up one leg and down the other (see above) this seam should over lap with the one you did for C.
Now try them on to see how much you want/need to hem. After hemming put the drawstring or elastic in and your done!
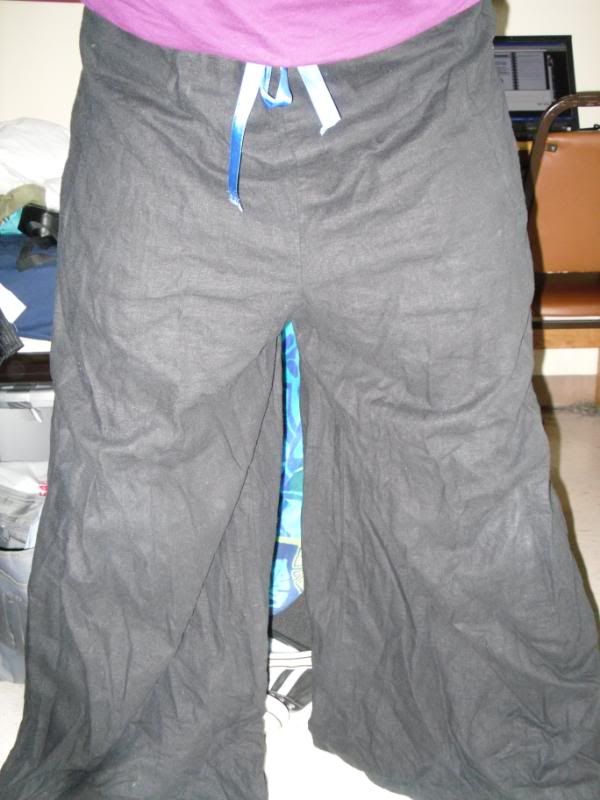
Here's a picture of mine: (I dug them out of my garb container just for you guys)

Now, here are a few things you can do with them if you feel like putting another 10 minutes or so into them:
Make the waist a lot bigger than necessary and dart it once on each panel, this will make them fall a bit nicer, I find, and it also is helpful if you just made the waist WAY too big.
Tie them at the foot, At first these were MC hammer Pants, they were bunched up at the bottom, and it was rather helpful for fighting barefoot so I didn't trip over the hem.
That about covers it.
www.kingdomofgwynedd.com/index2.cfm?page=HowToArea/Gwynedd-Pants/index.htm
Here's a tutorial I made that's up on the national boards, it's not period, but they are easy to make and comfortable, I have a pair, Glaum bought several from me, and Izad now has a pair as well www.dagorhir.com/forums/index.php?topic=13936.0 I'ma copy and paste the tutorial here as well
Here's an easy way to make some nice baggy pants that are very comfortable and easy to fight in, I have yet to find a reason to not like this pair of pants that I made with this pattern. (please excuse the terrible paint skills, my pen tablet doesn't get along with paint on my computer)

First things first get your fabric, 2 yards should be plenty (I used black Linen), lay it out on the floor and fold it so that there are four layers of fabric.
The measurements you'll need are:
A - 1/4 of your waist (make sure you add about two or three inches for seam allowance and for them to be pulled together with the draw string)
B - This will be how long the pants are PLUS seam allowance (remember, when you hem the waist and pant legs you may want to leave enough room for elastic or a drawstring!) Also, I'd suggest you start flaring out a bit from the waist immediately, if only a little.
C - This is the crotch. on my pair I made a very low crotch the length was over a foot, and the curve wasn't very dramatic, keep in mind, they should curve in a little over half of your waist's thickness (not as in around your waist, think more like small of your back to your navel thickness, now, make it bigger, because your butt works into the equation.) Don't be afraid to make the curve a little too big, it should be located a little closer to the bottom.
D - Is half the width of your pant legs at the bottom (don't forget the seam allowance)
E - This isn't important to measure, it's the length of the leg under the crotch (I have it marked so I can easily say which seam to sew)
Now that you got your measurement pin them/ draw them (in chalk) on your fabric, make sure that all four layer are lying flat and cut.
Now you've got four panels, take two and pin them together so that they line up evenly (lay one on top of the other) and sew the seam along C Don't go in to E though! you will make a skirt if you do! Take the two unsewn panels and do the same thing.
Congratulations you now have turned four pieces of fabric into two. Unfold them and put the two pieces right sides together so that they match up evenly (Remember, the right sides of fabric are the sides that will be seen, so you sew it inside out.) Pin the seams Lettered as B, they will be the two outside seams now that go down the length of the pants (look at the picture below) and sew them together.

This part (for me) is the hardest part of the project, and it's not too difficult. You're going to sew the insides of the legs together (the seam I labeled as E) and sew up one leg and down the other (see above) this seam should over lap with the one you did for C.
Now try them on to see how much you want/need to hem. After hemming put the drawstring or elastic in and your done!
Here's a picture of mine: (I dug them out of my garb container just for you guys)

Now, here are a few things you can do with them if you feel like putting another 10 minutes or so into them:
Make the waist a lot bigger than necessary and dart it once on each panel, this will make them fall a bit nicer, I find, and it also is helpful if you just made the waist WAY too big.
Tie them at the foot, At first these were MC hammer Pants, they were bunched up at the bottom, and it was rather helpful for fighting barefoot so I didn't trip over the hem.
That about covers it.


